How To Make California Rolls Step By Step
This post may contain affiliate links (disclosure).
California rolls are a classic sushi favorite, loved for their refreshing taste and satisfying texture. Making these at home is easier than you think, and it’s a great way to enjoy sushi on a budget. Whether you’re hosting a party or simply craving sushi night, this step-by-step guide will help you create restaurant-quality California rolls in your own kitchen!
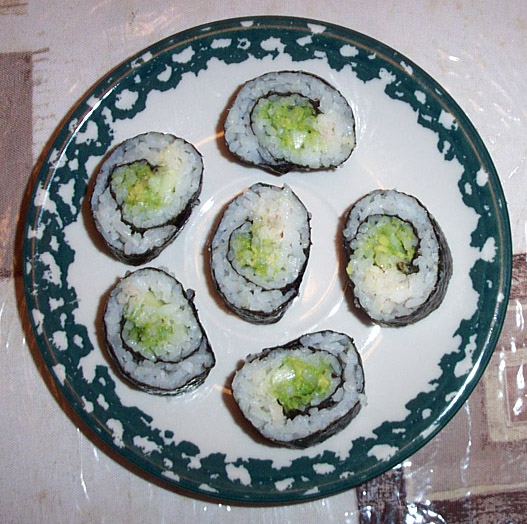
Why You’ll Love California Rolls
- Easy to Make: Even beginners can master this sushi with a few simple steps. No special equipment required—just fresh ingredients and a little practice!
- Budget-Friendly: Making California rolls at home is much more affordable than ordering them at a restaurant. You’ll save money while satisfying your sushi cravings.
- Customizable: You can easily swap out or add ingredients to suit your preferences. Think spicy mayo, tobiko, or even a vegetarian version!
- Healthy and Delicious: Packed with protein, healthy fats, and fresh veggies, these rolls are a nutritious snack or meal.
- Perfect for Any Occasion: Serve them as an appetizer, a light lunch, or a party centerpiece—they’re always a hit!
Are you a big fan of California sushi rolls? Do you love to eat the California rolls, but don’t have the money to spend getting sushi at Japanese restaurants? You can still have your roll and eat it too, even on a budget :) Your solution is to make California rolls at home by following this easy California rolls recipe!
Yes, you can make these yummy rolls yourself easily if you follow my simple step-by-step instructions how to make california rolls below. All you need to do in order to make california rolls is put the cooked rice, crab, avocado and cucumber on a sheet of seaweed and roll into a roll. After you roll it, cut it into pieces with a sharp knife and your homemade california roll is ready. The best thing is that when you make california rolls at home, it’s 3 times cheaper than buying them at a restaurant!
Recipe How To Make California Rolls
Preparation time: 5 minutes
California Rolls Ingredients
- Short-grain White Rice – Provides the sticky texture needed for sushi rolls.
- Crab Meat (imitation or real) – Adds the signature savory and slightly sweet flavor.
- Cucumber, cut into long thin slices – Adds a refreshing crunch to each bite.
- Mashed Avocado – Creamy and rich, balancing the textures and flavors perfectly.
- Nori (seaweed wrap, found in the ethnic isle) – Holds everything together and adds a hint of umami.
For the exact measurements of the ingredients, see the printable recipe card at the bottom of this article.
Kitchen Tools You Need to Make California Rolls
- Rice cooker – For perfectly cooked, sticky short-grain rice every time.
- Sharp knife – Essential for cutting clean, even slices of your sushi rolls.
- Cutting board – A clean surface to prepare your vegetables and roll the sushi.
- Small bowl of water – For moistening the nori edges and keeping your hands from sticking to the rice.
- Bamboo sushi mat (optional) – Helps to roll the sushi more tightly and evenly.
Instructions How To Make California Rolls
- Cook the rice (I always use the rice cooker). You must cook the rice on the same day as making your california rolls. Don’t refrigerate the rice, or it will get dry. The rice for the California rolls should be freshly cooked and sticky.
- Spread the rice on the nori. Leave one end of the nori (1 inch strip) uncovered. The layer of rice should be thin, so the nori shows through.
- Put the avocado, cucumber and crab on top of rice.
- Moisten the uncovered strip of the nori with some water (just use your finger dipped in the water). Roll into a tight roll. Start rolling from the side that contains the filling (the opposite side to the uncovered strip). The moistened uncovered strip should act as a “tape” that holds the roll together.
- Put the roll on the plate so the seam is on the bottom of the roll. Cut the big California roll into pieces.
Here are the step-by-step pictures of how to make California rolls sushi at home.
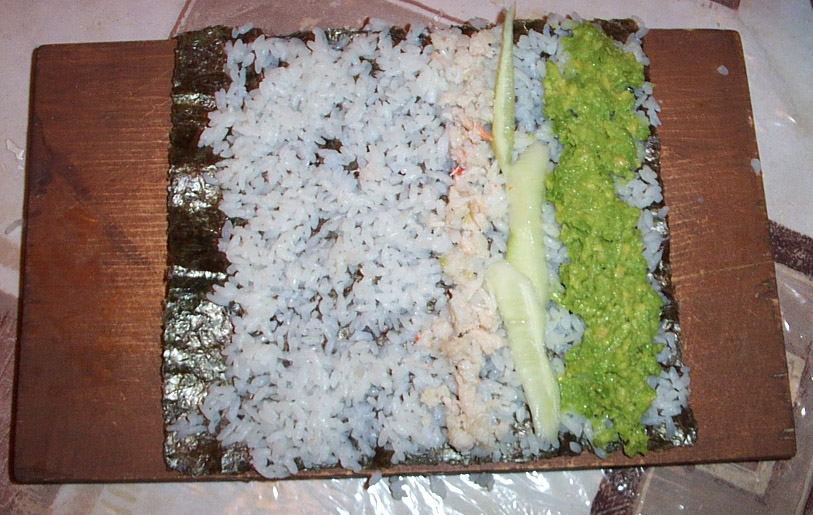
Step 1 Of How To Make California Rolls:
Layer the California rolls ingredients on a sheet of nori as illustrated below:
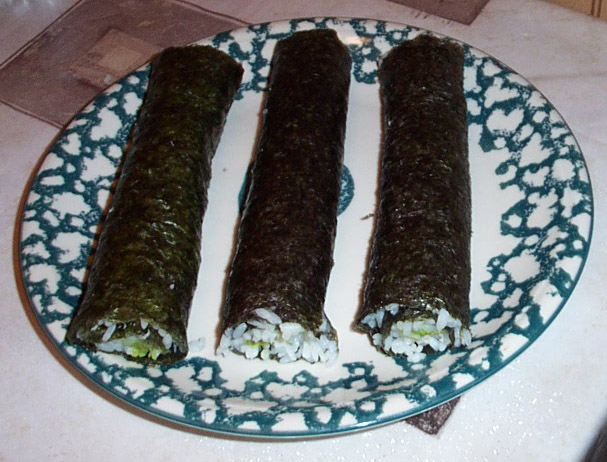
Step 2 Of How To Make California Rolls:
Roll the nori into a tight roll.
Step 3 Of How To Make California Rolls:
Cut the big California roll into pieces.

Enjoy your homemade california rolls with some wasabi and ginger! :) Also, check out these great side dishes for the California rolls: edamame and seaweed salad.
Serving Suggestions
- Arrange the California rolls on a decorative sushi platter for a professional touch.
- Serve with traditional condiments like soy sauce, wasabi, and pickled ginger for dipping and enhancing the flavors.
- Pair with a side of Crispy Air Fryer Edamame From Frozen or a refreshing Costco Seaweed Salad for a complete meal.
- Add a drizzle of Easy Homemade Sriracha Spicy Mayo or a sprinkle of sesame seeds for extra flavor and texture.
- Complement your sushi with a cup of Warm Honey Lemon Tea or a glass of chilled sake for an authentic Japanese dining experience.
Tips for Success
- Use the right rice: Short-grain white rice is ideal for sushi because of its sticky texture. Avoid long-grain varieties as they won’t hold together as well.
- Don’t overfill: A little goes a long way when adding fillings. Overloading can make the rolls difficult to seal and cut.
- Keep your hands wet: Wet your fingers with water to prevent the rice from sticking to your hands while spreading it on the nori.
- Use a sharp knife: A dull knife will crush your rolls instead of slicing them neatly. Wipe the blade clean and dampen it slightly between cuts for perfect slices.
- Practice makes perfect: Rolling sushi can feel tricky at first, but don’t worry if your first rolls aren’t perfect. With practice, you’ll improve quickly!
Variations and Substitutions
- Vegetarian Option: Replace the crab meat with julienned carrots, bell peppers, or tofu for a vegetarian-friendly version.
- Spicy Twist: Mix the crab meat with a little sriracha mayo before assembling the rolls for a kick of heat.
- Rice-Free Rolls: Skip the rice entirely and use thinly sliced cucumber or zucchini as the base for a refreshing low-carb alternative.
- Add Crunch: Include tempura flakes or crispy fried onions inside the roll for a crunchy texture.
- Gluten-Free Version: Use tamari instead of soy sauce and ensure the crab meat and other ingredients are certified gluten-free.
Storage and Reheating
- Storage: California rolls are best enjoyed fresh, but you can store leftovers in the refrigerator. Wrap them tightly in plastic wrap or place them in an airtight container to prevent drying out. Consume within 24 hours for the best flavor and texture.
- Reheating: Sushi rolls should not be reheated, as the rice and fillings are meant to be eaten cold. If stored, let the rolls come to room temperature for about 15 minutes before serving.
- Tips for freshness: To maintain quality, keep the rolls away from strong-smelling foods in the fridge, as nori and rice can absorb odors.
Frequently Asked Questions
Can I use a different type of rice for California rolls?
While short-grain white rice is traditional, you can use medium-grain rice if needed. Just make sure it is sticky enough to hold the rolls together. Avoid long-grain rice as it lacks the necessary texture.
What can I substitute for crab meat in California rolls?
If you don’t eat crab, you can use cooked shrimp, smoked salmon, or even a plant-based imitation crab alternative. For a vegetarian option, sliced bell peppers or julienned carrots work well.
Do I need a bamboo sushi mat to roll California rolls?
A bamboo sushi mat is helpful but not essential. You can roll sushi using your hands or a clean kitchen towel lined with plastic wrap for added support.
Why is my sushi roll falling apart?
If your roll isn’t holding together, ensure the rice layer is thin, and the fillings aren’t overpacked. Rolling tightly and sealing the nori with a bit of water also helps keep everything in place.
How do I cut sushi rolls cleanly?
Use a very sharp knife and wet the blade before each cut. This prevents the knife from sticking to the rice and ensures clean slices.
Other Easy Roll Recipes
Air Fryer Frozen Indian Kati Rolls – Quick & Crispy! – Enjoy perfectly crisp and flavorful frozen kati rolls in minutes using your air fryer.
Trader Joe’s Frozen Sushi Kimbap Rolls – Easy Cooking Guide – Learn the easiest way to prepare Trader Joe’s frozen sushi kimbap rolls for a quick, delicious snack.
Air Fryer Crescent Rolls With Cream Cheese Danish Filling – Make golden, flaky crescent rolls stuffed with sweet cream cheese filling in your air fryer.
Quick Air Fryer Frozen Dinner Rolls Recipe – Turn frozen dinner rolls into soft, golden perfection with this simple air fryer method.
Microwave Cinnamon Rolls Made With Tortillas – Whip up quick, gooey cinnamon rolls using tortillas and your microwave for a fun treat.
Crescent Roll Pizza Bites Recipe – Create bite-sized pizza snacks with crescent roll dough, perfect for parties or quick dinners.
Easy Air Fryer Fried Oreos With Crescent Dough – Indulge in crispy, golden air-fried Oreos wrapped in crescent dough for a delightful dessert.
How To Make California Rolls Step By Step
Ingredients
- 2 cups cooked short-grain white rice
- 1 cup crab meat imitation or real
- 1 avocado mashed
- 1 cucumber cut into long, thin strips
- 4 sheets of nori seaweed wrap
Recommended Kitchen Tools (click the links below to see the items used to make this recipe)
- Rice cooker
- Small bowl of water
- Bamboo sushi mat optional
Instructions
- Prepare short-grain white rice using a rice cooker or stovetop. The rice should be freshly cooked and sticky. Avoid refrigerating, as this dries it out.
- Lay a sheet of nori on a clean, flat surface.
- Use your hands or a spoon to evenly spread a thin layer of rice over the nori, leaving a 1-inch strip uncovered at one end.
- Arrange a thin layer of mashed avocado, cucumber strips, and crab meat across the rice.
- Moisten the uncovered edge of the nori with water. Starting from the side with the filling, roll the nori tightly, sealing it with the moistened edge.
- Place the roll seam-side down on a cutting board. Using a sharp knife, slice it into bite-sized pieces.
Notes
- Serve with wasabi, pickled ginger, and soy sauce for dipping.
- Pair with edamame or a seaweed salad for a complete meal.
More Appetizer Recipes
- Keto Shrimp Avocado Cucumber Appetizer Bites
- Cranberry Goat Cheese Bruschetta – Simple Appetizer Recipe
- Baked Brie With Honey – Easy Appetizer Recipe










Is Jasmine rice okay to use?
Hi Jessica,
Yes, I’ve made these california rolls with jasmine rice before, they turned out great!
Melanie
Do I have to moisten the nori from costco to be able to roll it. These are bite size roasted seaweed wraps.
The bite size roasted seaweed is too small too roll. You need a full-size nori (it’s close in size to a sheet of paper), and you don’t need to moisten it.
Help – please!!
I’m preparing for a party late afternoon – TODAY – and wanted to use the roasted seasoned seaweed squares that I purchased yesterday from Costo – as a nibble platter of sorts – but,. whilst your recipe took my eye, I see my squares are too small for this – and a little too small for folding with some filler – unless I put one on top oif the other like a raviolli parcel with savoury sticky rice inside. Any recepies / ideas would be most welcome
Thank you, Jo