How To Make Homemade Pita Chips In A Microwave
This post may contain affiliate links (disclosure).
Craving a crunchy, homemade snack but short on time? These microwave pita chips are the perfect solution! In just a few minutes, you can transform leftover pita bread into crisp, golden chips that pair beautifully with your favorite dips or make a tasty snack all on their own. Skip the store-bought versions and enjoy this simple, quick, and healthy treat anytime!
It is easy to make pita chips yourself at home. All you need is some leftover pita bread (the pocket pita kind) and the microwave.
Why You’ll Love Homemade Pita Chips in a Microwave
- Quick and easy to make: These pita chips come together in just minutes with minimal prep and cleanup, making them perfect for busy days or last-minute cravings.
- Healthier than store-bought chips: Made with just pita bread and no added oils or preservatives, they’re a guilt-free alternative to packaged snacks.
- Customizable flavors: You can easily season these chips with your favorite spices, from garlic and herbs to a sprinkle of paprika or sea salt.
- Perfect for dips: Their crisp texture makes them ideal for scooping up hummus, guacamole, baba ghanoush, or any dip you love.
- Budget-friendly snack: Transform leftover pita bread into a delicious treat without spending extra on store-bought options.
Ingredients for Homemade Pita Chips in a Microwave
- Pita Bread – Use leftover pocket-style pita bread. Its thickness works perfectly for crisping up into chips.
- Optional Seasonings – Sprinkle with garlic powder, paprika, sea salt, or any seasoning you love to add extra flavor.
For exact measurements, see the printable recipe card at the bottom of this article.
Kitchen Tools You Need to Make Homemade Pita Chips in a Microwave
- Knife – To cut the pita bread into chip-sized triangles.
- Microwave-Safe Plate – Large enough to arrange the pita triangles in a single layer.
- Microwave – The key tool for quickly crisping up your pita chips.
Here are the directions for homemade pita chips recipe:
Step 1:
Cut pita into small triangles (the triangles should be the size of the chips).

Step 2:
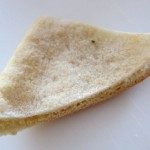
Separate the chips into 2 parts by opening the pocket of the pita (see illustration below), then tear to make 2 triangles:

Step 3:
Put pita triangles on a large plate in a single layer. It is very important not to overlap them, otherwise some chips will end up soggy.

Step 4:
Microwave the plate of pita pieces for 1 minute. Check to see if they are crunchy. If not crunchy, keep microwaving it in 30 second increments until the chips are crunchy. Enjoy your homemade pita chips!

What’s a perfect pairing for homemade pita chips? A homemade baba ghanoush!
Here’s my easy recipe for homemade baba ghanoush dip.
Serving Suggestions
- Pair these pita chips with Classic Creamy Hummus Dip for a classic Mediterranean snack.
- Serve them alongside a smoky Instant Pot Baba Ganoush for a delicious appetizer.
- Add them to a charcuterie board for a unique and crispy addition.
- Use them as a crunchy topping for Easy Instant Pot Mexican Chicken Tortilla Soup or Grilled Chicken and Roasted Pepper Chopped Salad.
- Enjoy them on their own as a quick and satisfying snack!
Tips for Success
- Use pocket-style pita bread: This type of pita is ideal because you can separate the layers, creating thinner chips that crisp up better in the microwave.
- Cut evenly-sized triangles: Uniform pieces ensure even cooking and crisping. Larger or thicker pieces may take longer to cook.
- Avoid overlapping: When arranging the pita pieces on the plate, make sure they are in a single layer without touching. Overlapping can lead to uneven cooking, with some chips ending up soggy.
- Microwave in intervals: Start with one minute, then microwave in 30-second bursts. This prevents overcooking or burning, as microwaves can vary in power.
- Season before or after cooking: If adding spices or seasonings, lightly sprinkle them over the chips either before microwaving or immediately after, while they’re still warm, to help the flavors stick.
Variations and Substitutions
- Seasoned Pita Chips: Sprinkle the chips with garlic powder, onion powder, smoked paprika, or za’atar before microwaving for extra flavor. For a spicy kick, try chili powder or cayenne pepper.
- Cheese-Flavored Chips: Dust the pita triangles with grated Parmesan or a sprinkle of nutritional yeast for a cheesy twist. Add after microwaving to keep the texture crisp.
- Herb Infused Chips: Toss the triangles with dried oregano, thyme, or rosemary before cooking for a Mediterranean flair.
- Gluten-Free Version: Use gluten-free pita bread if you’re avoiding gluten. Keep in mind that gluten-free bread may cook differently, so check frequently for crispness.
- Sweet Pita Chips: For a dessert version, brush the triangles lightly with melted butter (or a plant-based alternative) and sprinkle them with cinnamon and sugar before microwaving.
- Oil-Free Option: If you’re looking for an even lighter option, skip any added oil or butter entirely—these chips still crisp up beautifully!
Storage and Reheating
- Storage: Allow the pita chips to cool completely before storing them. Transfer to an airtight container or resealable plastic bag and keep them at room temperature for up to 3 days. Avoid storing in the refrigerator, as they can lose their crispness.
- Reheating: If the chips become slightly soft, you can refresh them by microwaving for 15–20 seconds or placing them in an oven at 350°F (175°C) for a few minutes. This will restore their crunch.
Frequently Asked Questions
Can I use flavored pita bread for this recipe?
Yes, flavored pita bread like garlic, whole grain, or onion pita works wonderfully! Keep in mind that the flavors will enhance the overall taste of your chips.
Why are my pita chips not crispy?
If your pita chips aren’t crispy, it could be due to overlapping pieces or insufficient microwaving time. Make sure the pieces are arranged in a single layer and cook them in small increments until they reach your desired crispness.
Can I make these chips in an oven instead?
Absolutely! Preheat your oven to 375°F (190°C), place the pita triangles on a baking sheet in a single layer, and bake for 8–10 minutes, flipping them halfway through.
What dips pair best with pita chips?
Classic dips like hummus, baba ghanoush, or tzatziki are perfect choices. You can also try guacamole, spinach-artichoke dip, or even a sweet option like chocolate spread for dessert pita chips.
Can I store these chips for longer than 3 days?
For longer storage, you can freeze the chips after they’ve cooled completely. When you’re ready to enjoy them, reheat in the microwave or oven to restore crispness.
Other Easy Pita Recipes
Air Fryer Pita Bread Pizza – A crispy and delicious personal pizza made effortlessly in the air fryer using pita bread as the base.
Grilled Veggie Supreme Pita Pizza with Mushrooms and Cheese – Loaded with grilled vegetables, mushrooms, and gooey cheese, this pita pizza is a veggie lover’s dream.
Turkey Sausage and Feta-Stuffed Pita Pockets with Peppers – These flavorful pita pockets are stuffed with juicy turkey sausage, vibrant peppers, and tangy feta cheese.
Quick and Easy Chicken and Onion Pita Pizza – A savory and speedy pizza recipe topped with tender chicken, caramelized onions, and melty cheese.
Simple Homemade Pocket-Style Pita Bread Recipe – Learn how to make soft and fluffy pita bread from scratch with this easy recipe.
Whole Wheat Pita Fajitas with Chicken and Veggies – A healthy and hearty twist on fajitas, featuring whole wheat pita bread, seasoned chicken, and colorful vegetables.
15-Minute Cheese Pita Pizza for a Quick Snack – Satisfy your pizza cravings in minutes with this simple and cheesy pita pizza recipe.
Homemade Pita Chips in a Microwave
Ingredients
- Leftover pita bread pocket-style
Recommended Kitchen Tools (click the links below to see the items used to make this recipe)
- Microwave
- Large plate
Instructions
- Cut pita bread into small triangles, about the size of regular chips.
- Carefully open the pita pocket to separate each triangle into two thinner triangles.
- Arrange the triangles in a single layer on a large microwave-safe plate. Avoid overlapping the pieces to ensure even cooking.
- Microwave the pita pieces for 1 minute. Check for crunchiness, and if not fully crisp, microwave in 30-second increments until desired texture is reached.
- Serve and enjoy with your favorite dip or as a standalone snack!
Notes
- For added flavor, sprinkle with garlic powder, paprika, or sea salt before microwaving.
- Be sure to monitor closely to prevent burning as microwaves vary in power.
More Snack Recipes
- Peanut Butter Banana Rice Cakes for a Healthy Breakfast or Snack
- Crispy Oven-Baked Green Peas Snack Recipe
- Air Fryer Frozen Salmon Bites with High Protein Power


Hi! Thanks for stopping by my blog!
I love little hints and tips like this – even though it might seem simple, a lot of people wouldn’t think of doing this. Would go great with hummus!
Dear Melanie, Thank you for the kind and cheerful birthday wishes….Blessings, Catherine xo
Those would go perfectly with some chickpea dip!
This is a great idea and one I’ll be borrowing very soon. Have a great day. Blessings…Mary :-)
What a clever idea! I must bookmark this recipe! :-)
Great tips for making pita chips…love it! Hope you have a great week ahead Melanie :-)
Yum! These look so crunchy!!! And healthy as well! Will surely try them with my left over pita! :-)
Your homemade pita chips look just perfect, great idea!
Oh how a marvelous idea!! This is just the best healthy option than those high-calorie sodium-filled potato chips you get in the market..and then you can also dip it in a fondue made from Gruyere cheese, Raclette cheese, and Stilton Cheese! Yum yum!!
I have always wanted to learn how to make pita chips! But I was always told that it was hard for such a small piece of food. This post has changed that! I can’t believe I just need a microwave! Many thanks!
Yum! What an easy way to make pita chips. I want to do pita chips for snack so to add flavor I will be sprinkling it with cheese powder or garlic powder. Thank you for sharing your tips.